Dll in binary — Архив WASM.RU
It was shown in the article «Win32 Appy by Hand» how to «assemble» the simplest Win32 application with the only MessageBox using debug.exe. This time let’s create the simplest dll in a similar manner; this is the continuation and further elaboration of the previous work and the necessary foundation for my future articles, because I am going to describe how to create COM components in binary and it is quite impossible to manage without dll’s there.
I hope that a reader has thoroughly studied the last topic and now can easily create PE headers, import tables and code and data sections on the fly
It is supposed, too, that because of Svin’s work followed by epidemic enthusiasm with Intel’s manuals everybody will be able to understand hex’es or even binary codes. So we will concentrate on more useful things – namely, what is the difference between dll’s and usual exe-files. There are two main points here: first, exported functions appear hence export tables, too, and second, we will have to investigate relocations because it is not guaranteed that our dll will be loaded to the preferred base address of 10000000h :(
This time let’s create 4 sections in our PE-file: for code, data, import with export and relocations. We will name these sections .code, .data, .rdata and .reloc respectively. The sections will be located in memory at offsets 1000h, 2000h, 3000h and 4000h, and in a file at offsets 200h, 400h, 600h and 800h correspondingly. The content will be the same as in the last article, i.e. we will export the only function and the only work it does will be dispalying of MessageBox. Thus there are only two strings of data; create the file data.txt:
Код (Text):
I hope it is clear that these are commands for debug.exe written in the file. This time we decided to automate the work somewhat
Using debug.exe is not mandatory though. If you wish you can use any hex-editor e.g. HIEW or QView or something else. Then you can build dll as a single file not divided into separate auxiliary files as in our case. In any case the .data section must look like this in memory:
Код (Text):
So the title string is located in the beginning of the data section at offset 2000h and the memory address will be at offset 10002000h correspondingly. The values for the message string will be 2010h and 10002010h accordingly. Do not forget that the .data section begins in the dll file at offset 400h.
And now the code! We will have to import MessageBoxA from User32.dll again; this time IAT will be located in its own section – .rdata – in the very beginning as usual, i.e. at offset 3000h; the memory address will be 10003000h. There are no other imported functions there. The .code section will look like this:
Код (Text):
To use debug.exe fill in the file code.txt:
Код (Text):
Do not remove the empty string after ‘db c3’! Otherwise debug will complain and you will get nonsense instead of a cool binary block
So we did it – the half of the work is already done! It’s time to proceed to the new subject now. Let’s look at our code and mark unsafe places:
Код (Text):
I marked out in bold the memory addresses that are parts of instructions. The system easily can load our dll in a quite different location – then we will get our addresses broken and the code will push garbage in the stack and send it to unknown place instead of our imported function. It is the three 32-bit values that must be fixed up; we must specify them in fix-up table for that purpose.
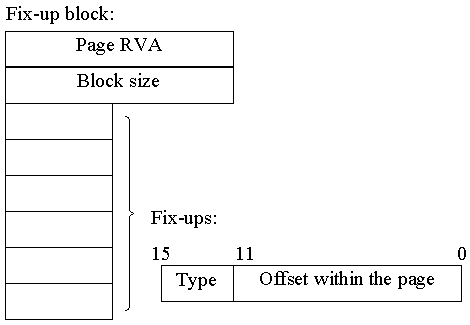
Each fixup is represented with only two bytes (16-bit values), the 4 high bits being the fixup type. The fixup type nearly always is 3 for Win32, meaning the system must fix up the 32-bit address at the given offset. The offset is represented with the remaining 12 bits of the fixup. As you can see this is enough for offsets within the single memory page (4 Kb) only. So the fixups for the given memory page are combined in fixup block. The first 4 bytes at the beginning of the fixup block contain the offset of the memory page relative to the base load address and the next 4 bytes contain the size of the fixup block (including the first 8 bytes). The remaining of the fixup block is a collection of fixups for the memory page (see picture).
When loading a so called delta is calculated as the difference between the preferred base address (indicated in the PE-header), and the base where the image is actually loaded. If the dll is loaded at its preferred base, the delta would be 0, and thus the fixups would not have to be applied. Otherwise the delta is added to each 32-bit value that has the corresponding fixup. And that’s all.
In our case there must be 3 fixups; their offsets are 3, 8 and 10h relative to the page beginning. Including the fixup type (3) we will get values 3003h, 3008h, and 3010h. A fixup block must be aligned on DWORD boundary, so we add one more «empty» fixup at the end (it has even its own type – of course, 0). Finally we get: page RVA is the offset of the relocated page, that is, the code page – 1000h; the block size is 8 bytes (block header) + 3 fixups, 2 bytes each + 1 «empty» fuxup (2 bytes) – 10h in sum. The relocation section is ready! It looks like this:
Код (Text):
Fill in the file reloc.txt:
Код (Text):
Now only export remains. Since my readers are great specialists on import no word will be said about it more
The main table combining all the other information is the export directory table. It has the following fields:
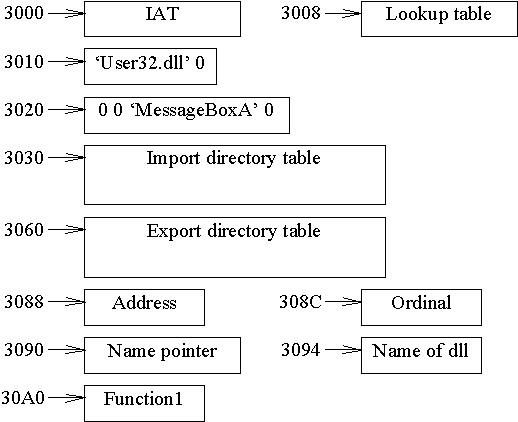
Offset Size Description 0 4 Reserved (0) 4 4 Time and date the export data was created. 8 2 Major version number. 0Ah 2 Minor version number. 0Ch 4 Offset (RVA) of the ASCII string containing the name of the DLL. 10h 4 Starting ordinal number for exports. 14h 4 Number of entries in the export address table. 18h 4 Number of entries in the name pointer table. 1Ch 4 Offset (RVA) of the export address table. 20h 4 Offset (RVA) of the export name pointer table. 24h 4 Offset (RVA) of the ordinal table. See the following picture for interrelation of various tables:

As you can see export data contains mainly various offsets and indices. When exporting using ordinals only we need only two tables: the main export directory table and the export address table. The latter is a simple array of 32-bit offsets of the exported symbols, that is the implementations of the functions we export relative to the base load address. Thus each exported function has its own index to this array; adding the ordinal base to that index we get the function’s ordinal.
If functions are exported by names, there must be three additional tables: the ordinal table, the export name pointer table and the export name table. It is clear with the export name table: it contains the names to be exported. The number of names can be less than the number of entries in the export address table. The export name pointer table contains offsets (RVAs) into the export name table. In fact the export name table is simply a list of strings containing names for exported functions; and the export name pointer table contains offsets to those strings. But the pointers to the strings must be ordered lexically to allow binary searches between function names. Note: it is the name pointers that must be ordered not the names (that is, strings) itself. The export ordinal table is another array, but it contains 16-bit (not 32-bit!) indices into the export address table. The ordinal table and the name pointer table are joint in that the index of each of these arrays corresponds to the same function. So if we have a function name (a string in the name table) and a pointer to that name in the name pointer table, the location of that pointer in the name pointer table is determined by the lexical order of the name. And we will find the index into the export address table at the same relative position (that is with the same index as in the name pointer table) in the ordinal table. After we get index into the export address table we can get the function address itself in the address table.
Well, it is time to proceed to the last section – ‘.rdata’. First we will try on a layout (see picture)
Here is the .rdata section itself:
Код (Text):
And now the file rdata.txt:
Код (Text):
Do not forget to keep the empty strings! Now we will have to only slightly modify our PE-header (compared to our first article). Here it is in full:
Код (Text):
And here is how to create it using debug.exe (file header.txt):
Код (Text):
That’s all! So we have five fragments (4 sections and 1 header) and 5 corresponding files if you used debug.exe. The next table summarizes our data:
RVA in
memorySection File Offset
in file0 (Header) header.bin 0 1000 .code code.bin 200 2000 .data data.bin 400 3000 .rdata rdata.bin 600 4000 .reloc reloc.bin 800 If you have used hex-editor, your binary file is ready. If you have used debug.exe you will have to combine the five binary files into one dll. Put all together in the file make.bat:
Код (Text):
Launch this file and – hurrah! – we get out dll. Necessarily look at created report file – report.lst – to check for errors that may be reported by debug. Carefully look for errors. You perfectly know: cut&paste technique does not protect against the most stupid errors!
Well; but we will need some exe-application to test our dll, won’t we? I have absolutely no doubt that now your level will permit you to easily create such a test program using debug.exe
Well, well... I see some confused faces. You have famously worked for a while today (if you have read this up to here) so I decided to grant you a «lazy» test application in MASM32 as a bonus. Here is it:
Код (Text):
Copy created dll.dll with new name ‘dll2.dll’ in the same folder. The point is that we need to check for correctness of our fixups and for that system can work with them. We need at least two dll’s with the same preferred base load address for that purpose. The most lazy approach one could imagine is to use the second renamed instance of the same image. But you can experiment with them of course, at least to change text strings for output messages and create another dll with different module and function names.
See you later!
© Roustem
Dll in binary
Дата публикации 4 дек 2004
